Wednesday, February 26, 2014

Just Beyond the Frame


In December of 2013, I began volunteering at the local animal shelter by taking pictures of the adoptable dogs.  Due to changes in our childcare, I was forced to drag Skyler to the shelter with me on picture day every week instead of going at it alone.  Well, it was actually a little less "dragging" and a little more "holding back," but nevertheless, the two of us wandered through the kennels together choosing small dogs that needed to be photographed and were gentle enough to interact with my four-year-old.

Skyler absolutely loves animals and has no concept of what a dog might be capable of if they are scared or uncomfortable in a situation, so we had the "No hands in cages...EVER," conversation before we went for the first time.  Still, saying that it was overwhelming at first would be an understatement.  It was incredibly challenging to collect a single dog from a kennel without releasing the other dogs, while Skyler squealed with delight and jumped around, while the barks of 20+ dogs are bouncing off the center block walls making it impossible to think let alone shout directions, while the just-released dog is darting back and forth on the end of the leash terrified and unsure of which direction to run, while thoughts are racing through my head about Skyler's safety and every possible danger that could be lurking just around the corner in an instance... that pretty much sets the scene.

Something was missing in my pictures.  The dogs weren't connecting with me.
 
The first couple weeks were daunting and exhausting until Skyler and I found our routine.  Without needing to shout directions now, I find the dog we need to photograph, she stands a few feet off within sight but out of the way, and then we take the dog into the outdoor play area for pictures.

Around the second or third session, being quite pleased with the pictures I had been capturing, I began noticing a common thread and a difference between the faces of the dogs I had shot alone versus the faces  of the dogs I was shooting now.  I had been zooming in tight around the dogs, so I decided to open up the pictures a bit and capture some of the "action" going on just out of view, and what I began seeing touched my heart.

The first photo session that I shot on my own never quite had the "feel" I had been desiring.  Chock it up to beginner troubles, but it felt like something was missing.  Though I love dogs, they were unsure of me and remained aloof.  I couldn't seem to connect with them whether it was due to my unfamiliar scent or my being distracted with the camera.

Once Skyler entered the equation, that all changed.

At first, I wanted her close by my side while the dog was running around the play area.  I wanted her tucked away so she wouldn't interfere with my shot and I wanted her out of harm's way.  After all, these dogs are mostly from troubled or unknown backgrounds, but they were all attracted to her.  I call it the Little Human Effect.

She began playing with the dogs.  They were much more willing to approach her than they were to me because I'm that crazy lady that keeps shoving the black clicking thing in their faces, and what I saw was like magic!

The dogs' faces were lighting up.  They were coming out of their shells.  They were much more willing to shake off their uncertainties for my happy-go-lucky child.  Looking back, I wish I had tried less to zoom in on just the dog and tried more to capture the entire scene because that was where the magic was happening.

Skyler has an honest connection to these dogs and seems to bring out the best in each one.  This week, we had a shy little baby who ran from me every time the shutter on my camera clicked, however, she would follow Skyler's directions like they had been training together for weeks.  She connected with Skyler instantly, and I believe the pictures speak for themselves.
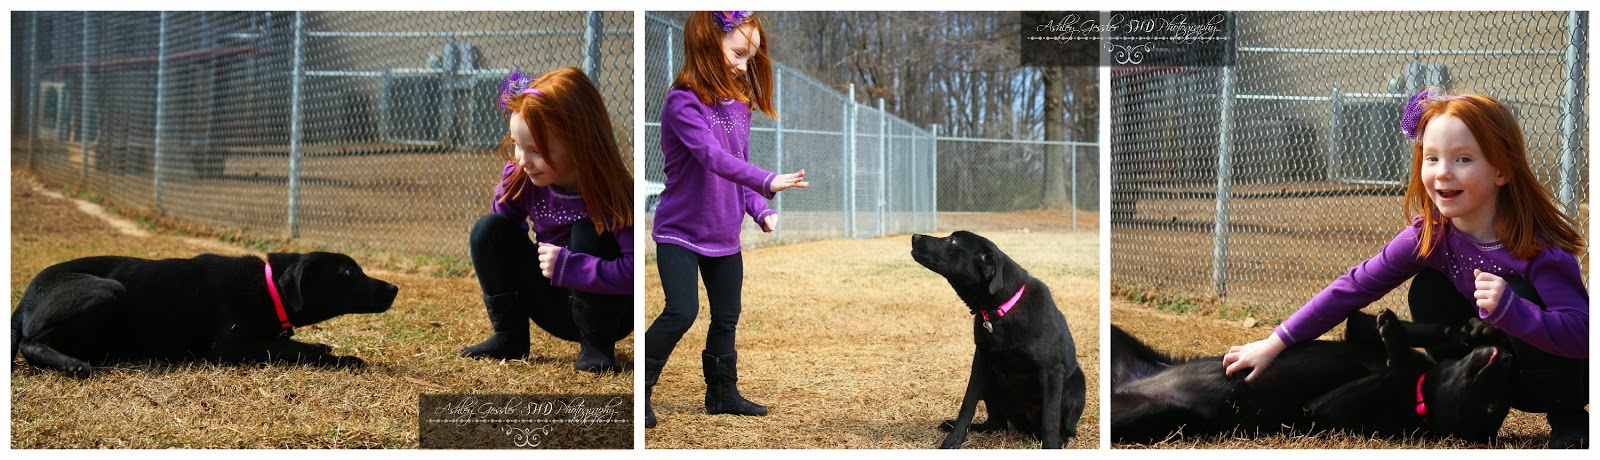
If I had been focused solely on what I was there to photograph I would have been missing these precious moments.  Last night, as I flipped through the pictures with Skyler's hand on the dog, or her boot foot in the frame, I would have ordinarily tossed them out since they couldn't be used for the shelter's purposes.  But, this time I saved them, and I'm so glad I did.

I see a kind heart and a genuine spirit that animals respond to.  I see a love that needs to be nurtured.  I see a quality that should be cherished and could one day develop into a talent that changes the world.

As a parent, I should be less focused on "What I'm there to do," and use the situation as a teaching moment that not only develops my daughter's heart, but also makes for some really great pictures that I would have otherwise missed.

Sometimes, I become so focused on what I want to see through the view finder that I'm shoving Skyler into the background and getting irritated without thinking about how it affects her.  It was, and still is, a common mistake on my part, and one that I deeply regret.
Sometimes the pictures are slightly unflattering (aka closed eyes, booty shots, princess boots in the frame of an otherwise perfect photo) but from now on I will be saving every shot I have with her in it even if the picture can't be used for the animal shelter's site.

BECAUSE THAT'S WHERE THE MAGIC HAPPENS.

This is where Skyler's learning about the love of animals, she's learning how to adapt herself to the needs of that particular dog, she's learning how to be kind, she's loving life, and she's being a kid, which is all too often devalued these days.  No longer will I crop her out of every frame.  I'm going to be a more patient parent, and I'm going to document these small and otherwise unnoticed achievements.

I have no way of knowing which moment might mold the rest of her life.

Please visit my website
www.AshleyGesslerSHD.com

Wednesday, September 18, 2013

Making a calendar- Grassland

So, my wonderful husband came up with a really great idea... "Why don't you make a calendar of all the local riders and sell it in the store?"  Golly!  Why didn't I think of that!?

So, I have been traveling out on a sweet adventure- and a truly rewarding one at that!

God has blessed me with so many wonderful horsey friends that love having their picture taken!  After all, who doesn't want to show off their pony?

I began gathering names... and phone numbers... and locations... and then I started scheduling... fun stuff!

The very first barn to contact me was Grassland Ranch in Athens, AL, and they also became my very first Calendar Photo Session.

Being out at Grassland was such a treat for me because, being an English rider, the Western world can be exhilarating!  I was fortunate enough to have a model, a barrel racer, and a rodeo queen all together on the same day, which made for some beautiful pictures!  I also had some riders who preferred the more laid-back approach to their riding, which was fine by me.  The mix of riders was beautiful, the weather was absolutely perfect, the horses were all amazingly cooperative, and it couldn't have gone any better.

The field we did most of the photographing in made for some beautiful pictures.  From the road, it looked like it was about waist-high, however, once I began wading through, I found that in places it was almost up to my shoulder... and I'm 5'9"!  My rodeo queen's mother was also wading through and at one point all I could see was the top of her head sifting through the long grass.

One of my riders that day, Desiree, rode her plucky little pony named Sherman who happens to be a Haflinger.  I have always held a special place in my heart for Haflingers because I have always found them to have such sweet natures.  While I was photographing Desiree, I asked her if she could pick up the canter (ahem- excuse me- LOPE) and she informed me that Sherman has a bit of a bucking side.  However, he performed beautifully and they kept all four feet on the ground!

Every one of these pictures makes me smile.  They touched that creative place inside my soul, and even though I plan on sticking with my English saddles for all of eternity, my imagination went wild.  You could get a high off of all that leather!

Perhaps, someday I'll have the opportunity to go back for one reason or another.  Fingers crossed!

Andy, Christy, Mike, Amanda- the Trainers at Grassland Ranch


Please visit my website
www.AshleyGesslerSHD.com

Monday, September 2, 2013

Logo Evolution

Since the beginning, my artwork has had a name... The Sweaty Horse Collection.  Every one of my dreams has always involved the Sweaty Horse name somehow.  In fact, when I was in middle school, I decided I was going to open a tack shop with rustic, wooden floors, a miniature pony that would be kept in the "petting area" in the back, and a coffee shop at the front of the store.  And, the name of it would be The Sweaty Horse Store.

 
My very first logo wasn't much of a logo at all.  Really, it was just a name I put on the front of my artwork folder and called a "Collection."

The second version, again, was just text and was used only as a watermark or a signature in the lower corner of a purchased photo.

It was time to grow up and my logo needed to evolve as well.

I began thinking on what I wanted in a logo... it had to reflect my passion (horses), it had to include my name, and it needed to be creative enough that it could become my brand.

 
The tribal horse became an image I was quite fond of because it was simple, had the flow I was looking for, and could easily be used as an overlay by dropping the background.  These three were my favorites, so I incorporated the outline on the third, and the mane of the second into my logo.

 
Thus, my first logo sketch came to life and the Sweaty Horse logo was born!


Please visit my website
www.AshleyGesslerSHD.com


Photo Blogging Experiment

I think I'll try a slightly new experiment on here.

In the past, I have primarily focused on my creative projects for blogging inspiration, but here lately my time has been consumed with photography and all the fun adventures that go along with it!

Over the past 8 months I have graduated an online photography class, photographed several friends' horses, developed my first real logo, started up my own photography business, and had the pleasure of photographing some amazing people!

If you've been keeping up with me on Facebook then this may or may not be anything new.

Nevertheless, here is the brief history of what I've been up to this year!

My diploma from the Photography Institute


As one of my final projects through the Photography Institute, I was supposed to recreate an image from my favorite photographer.  Naturally, I chose the iconic Robert Vavra.


After graduating, I started taking part in some of the free online clinics available through CreativeLIVE.  If you're artsy and haven't known about CreativeLIVE, you have no idea what you've been missing out on!

I also began having the wonderful opportunity to photograph for some of my horsey friends which I am eternally grateful!  I am blown away that people are actually willing to buy the images that I produce and it has been a truly humbling experience.

Some of my very firsts were:

 
Happy.  Owned by Julia.
This was one of those crystal clear days in January.  Happy was my model for the Robert Vavra project I mentioned earlier.  He was incredibly energetic and performed beautifully!

 
Jessica and Derek.
You'd never know it by looking at these two, but it was frightfully cold this day!  I was bundled up in my heaviest coat to crawl around in the mud, but it was completely worth it.

Pozzi.  Owned by Karen.
Pozzi is just one of the incredible survival stories at Victory Alliance Ranch, but his really stood out to me.  As a young stud, Pozzi was "mistaken for a deer" and shot through the neck by hunters.  Vets thought he should be put down because if it was possible for him to survive, they thought he would never be able to use his neck, let alone move around.  His owner never gave up on him, and now here he is!  It would have been a tragedy if no one had given him a chance at survival.  He is the kindest, most gentle stallion I have even encountered.  He bears the scar from the bullet, but he brings hope to the wounded warriors who visit Victory Alliance Ranch.  It was truly an honor to photograph him.

 
Chaos.  Owned by Karen.  Handled by Ashley.
This lovely fellow is a Russian Budyonny.  The Budyonny was originally bred as a Russian military horse but is now primarily an all-purpose competition horse.  This photo session was at a local show and was quite entertaining to watch seeing as how Chaos spent more time on his hind legs than on all four, but Ashley did a fantastic job with him in spite of his bad behavior!


I have been so very blessed by the good Lord in my new endeavor, and I thank Him for what He has blessed me with and pray He continues to bless me so I can continue to grow and improve.

Please visit my website
www.AshleyGesslerSHD.com

Tuesday, December 25, 2012

Making printed candles

When I was looking for a way to make custom candles, I typed "candles custom" into YouTube and found this super neat technique!

 This photo was taken while the candles were still warm.

I've been making these for well over a year now and have finally somewhat perfected my technique.

So here's what you do:

Start with white or cream colored candles.  (I like the kinds with a really soft wax... the kind you can scratch easily.  The wax melts much more evenly, so spend a little more and buy the $12 candle instead of the $6 or cheaper brands.  I generally wait and buy mine at Hobby Lobby when they're half-off.)

You'll also need:
Plain white tissue paper
Scotch tape
Computer paper
Wax paper

Lay the candle down on a piece of computer paper and mark the candle's size.  Decide how long and wide you want the image to be.

Insert your chosen image into your word processor.  Adjust the Page Layout to match your paper (either Landscape or Profile).  Hold your computer paper with the candle size marking against the screen and adjust the Zoom until the page on the screen is the same width as the computer paper.

Okay.  Once that is done... resize your image until it fills your candle's size markings.


 With a new sheet of computer paper, you want to cut your tissue paper to a slightly larger size.  Check your tissue paper.  There is a lightly shiny side as well as a dull side.  You want the shiny side to be against your computer paper so your image will be printed on the dull side.  Fold over the edges and scotch tape the tissue paper onto the back of the computer paper.

Insert your paper tissue-side down into your printer (depending on your personal printer).

This is a good tutorial I found on YouTube.


Print your image onto the tissue paper.  I always allow mine to dry for a minute or two before messing with them.  Consider me paranoid.

Cut out your image while it's still attached to the computer paper.  It makes the tissue paper less-likely to tear.  Test it on your candle.  Trim and make adjustments as necessary, then the fun begins!

I use a regular old hair dryer with a concentrator nozzle for all of my candles.  Use HIGH heat and HIGH speed.

Lay your tissue and wax paper aside.  You won't need them for a few minutes.  Begin blowing your candle to warm the wax.  Continue warming until a slight moisture is barely visible on the surface of the wax.  This is not warm enough for the wax to bead or run, just lightly warm to the touch.  I can tell by how "oily" the candle feels to my fingers, but you'll be able to judge better with the more you do.

When the candle is sufficiently warm, add your trimmed tissue paper taking care to smooth out wrinkles and gently pull it taut around the candle.  Wrap your wax paper around the candle and begin blowing with your hair dryer.

As you heat the wax, the wax will melt and saturate the tissue paper and seemingly leave the printed image on the surface.  Be extremely leery of bubbles or wrinkles in your tissue paper as you work.  When the wax cools, wrinkles have always appeared on the surface of my candles.  With practice, I have been able to minimize their appearance, but unable to eliminate them completely.  Please, if anyone knows some trick to preventing them, please share your knowledge!

I like to start in the middle and work either to the right or the left.

This tutorial is the one I watched to develop my own technique.


If your image is designed to wrap the entire way around the candle, make sure one end is completely saturated with wax before working on the other side.

Once your tissue is completely saturated with wax, allow the candle to cool for several hours and then you're done!

It's during the cooling process that my tissue paper inevitably wrinkles.  If you know or figure out how to prevent this, PLEASE SHARE YOUR SECRET WITH ME!

This photo was taken once the candles were cool.  See the light wrinkling on the Juicy Couture one?

Please visit my website
www.AshleyGesslerSHD.com


Friday, December 21, 2012

A collar of my own making... for the pooch

We have a new dog. She's a 4yr old Miniature Schnauzer, and she is an absolute princess! Taking that into consideration, she deserves a collar to match her award winning personality. I typed in "rhinestone pink dog collar" into Google to see what it would come up with... this is what I stumbled across.
And I thought to myself... I can do that.

 So I went shopping: choke chain for $1 and 18 feet worth of pink ribbon for $2 from Walmart, a package of split rings for $2, a poodle charm for $3, and three large lobster clasps for $1.50 from Hobby Lobby.

I have less than $10 in this project and TONS of left-over materials for additional creations!

So we begin.

I measured the clasp and chain parts (including one of the large rings) alongside Phoebe's current collar.  I marked one link longer than I figured I would need (now, I am extremely grateful I did).  I had my husband cut the chain.

Now, with my newly-trimmed chain, I attached the clasp to one of the split rings and attached it to the end of the chain.

Next, I began weaving the ribbon through the chain.  Once I had woven through the entire length, I tied off the ribbon and melted the knot with a lighter.  Repeat on the other end.

Attach your chosen charm.

Easy as that!

 
Phoebe is getting a new collar from Santa for Christmas!

Please visit my website
www.AshleyGesslerSHD.com


Sunday, November 11, 2012

When I feel a little kinky...

Some mornings I wake up and I just feel kinky...

What's a girl to do?

Here's an easy way to FORCE your hair to curl if it has a little natural wave but really doesn't curl on its own... but it doesn't like to go straight either... how irritating.

You'll need: Curling Cream, Gel, Mousse, Flexible Hairspray, and Tresemme Curl Locking Spray.
I use Curly Sexy Hair: Curling Creme, Garnier: Curl Shaping Spray, Tresemme: Flawless Curls Mousse, Dove: Extra Hold Hairspray (It claims to condition while you style. I don't know if this is true or not, but it certainly doesn't make my hair feel stiff and yucky!), and Tresemme: Curl Locking Spray.

Most any brands will do.  Use what works best for your hair.

The only one I strongly recommend sticking with is the Tresemme: Curl Locking Spray.  I've tried what seems like an infinite number of other brands and none of them work quite as well.  They either frizz my hair, or they get gummy and tacky feeling, or they generally don't smell good.

If it doesn't smell good, why waste your money?

Cream- roots to tips.
Gel- tips only.
Mousse- roots only.

1. Don't brush your hair after getting out of the shower!
2. Pull your hair down from under your towel and just lightly run your fingers through it.
3. Flip your head upside down and scrunch.
4. Spray Tresemme: Curl Locking Spray to one small section of your hair.  Start with the ends since they will dry first.  (The alcohol in the spray helps your hair dry faster so it will hold the shape you're forming with your fingers.)
5. Immediately squeeze the freshly sprayed section of hair with your hand and dry with your hair dryer (on HIGH heat and LOW speed) while supporting with your hand.
6. Repeat in small sections until all your hair is dry.
7. Once all your hair is dry, lightly mist with your flexible hairspray and continue to scrunch!

You're ready to style and go!


TIPS:
+Once a section of hair is dry, don't spray with the Curl Locking Spray.  It will cause the hair to frizz.
+Remember to constantly move your hair by flipping your head from side to side.  This helps prevent your hair from getting too stiff as it dries.
+Don't spray your entire head with the Curl Locking Spray!  It will cause your hair to dry straight instead of curly!  The secret is: one small section at a time.


Voila!
Curly hair!


Watch the full tutorial here:
Please visit my website
www.AshleyGesslerSHD.com